Ten Sewing Project to Add Stitching to Your Projects
A needle and some embroidery floss can create a magical effect of texture and dimension on any creative project! If you've ever wanted to learn about adding stitching to your paper crafts, you're in luck—the teachers at BPC classes have compiled ten techniques to get you started! Create an embroidered heart with Ashley Horton in Sew Easy. In Embroidered Stamps, create one-of-a-kind home decor with Laura Wonsik. And combine various stitches to create a stunning focal point with Paige Evans in Paige's Pages | 12. Try these projects and more to add stitching to your next project!

Paint inside your stitching.
Paige's Pages | 09, Paige Evans
Using a needle, I pierced a hole every quarter inch or so along my stencil, then erased the pencil outline. I stitched with a basic back-stitch. Then, I simply painted in the flowers. I like to paint after I’ve done the stitching because the thread keeps the paint in place for the most part. Yes, the color does get on the thread, but I like that look. Once everything is dry it’s time to start embellishing. Remember to balance the colorful florals and photos going on by leaving one corner empty. Match your paint colors to the supplies you plan to use so everything coordinates!

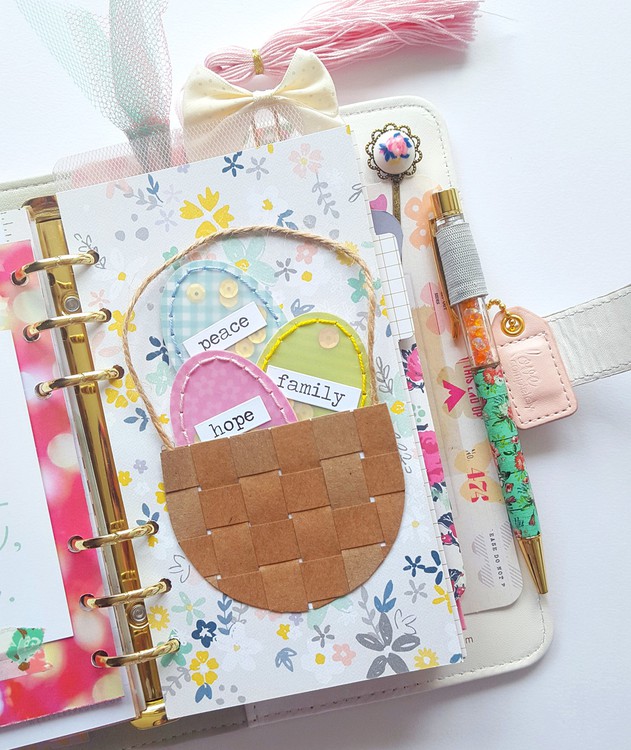
Combine embroidery hoop stitching with your layout to create a beautifully embroidered heart.
Sew Easy, Ashley Horton
Pick up your embroidery hoop and canvas at the craft store. I used a six-inch hoop. You want to make sure your stitched design is a little larger than the shape you're placing it behind. Draw your shape or design on the canvas before you start stitching. For the straight stitch, try to line up your stitches as close together as possible to fill in the section you are stitching. If you have any extra space showing between your stitches, just go back over it with another stitch. Nobody will notice and it's supposed to have a hand-made look anyway! Once your embroidery stitching is finished, trim away excess canvas, but make sure to leave enough so you can adhere it to the backside of your layout. Secure the embroidery stitching by covering it with leftover card stock. This will prevent the embroidery floss from getting caught on other pages or when you are trying to place it in your page protector.

Embroider beautiful wall decor.
Embroidered Stamps, Laura Wonsik
I embroidered animals with the names of our family members from a pattern found at Sublime Stitching. I created the four animals—a bear, bunny, owl, and fox—to represent my husband, me, our dog (who sadly passed away a year ago), and our daughter. The original pattern has the name of the animal, but I cut that off and customized the pieces by using Microsoft Word to add our names using a cursive font.

Create an eye-catching accent with paper piecing and stitching.
Stitch a Statement, Laureen Wagener
Chose an image that consists of different pieces to make the piercing part more fun and interesting to look at. Browse through your cut files to see which designs you already have that might work for paper piercing artwork. Grab a pencil and sketch out a design yourself—use your imagination and create paper pieced trees, animals, or flowers. Chose a color of thread that stands out against your papers—if you used a lot of white papers, use a colored or black thread. If you used lots of colors, white can be a great contrast.

Incorporate embroidery into traditional scrapbooking with a few basic stitches!
Paige's Page | 12, Paige Evans
I was armed with a cute aqua hoop and fabric and ready to tackle my first ever embroidery hoop project. I picked thread colors to match my "Oh My Heart" collection and then utilized YouTube to learn some new stitches. I thought they would be difficult to learn but they were pretty easy! Mary Corbet’s YouTube channel is a great resource for learning stitches. I think most of these stitches can be done through cardstock but having fabric in a hoop definitely made the process easier and much sturdier!

Create a custom "pixel people" portrait of loved ones.
Custom Cross-Stitch Characters, Lauren Wonsik
Though I'm a scrapbooker at the core, cross-stitching has been a fun side project and has offered me the chance to be crafting, even when I'm away from home. I've cross stitched family members, friends, and even casts of my favorite TV shows! Whether you want to model your characters after people in your life or craft them from your imagination, I'm going to walk you through the process of creating a pattern of characters to serve as a guide for a completed cross-stitch. In addition, we'll discuss ways to incorporate the completed pattern in paper crafting to make the most use of your pattern.

Make your own patterns by stitching around shaped elements on your layouts.
Stitch It, Nicole Nowosad
When making a pattern using stitching, use patterned paper or cardstock that is less busy so the design shows up against the patterns. Think outside a shape! It’s fun and interesting to add stitching around a simple circle or square to show a continuation of the shape on your page. Don’t worry about sewing “perfectly.” When stitching in a circle, go around a few times to cover any weirdly shaped areas. It'll look like it was intended to be that way! If you're creating a lot of stitching for a background pattern, be sure your bobbin is the same thread color. Change up and mix thread colors. Don’t be afraid to use different colors of thread for your design. And don’t be afraid to have fun with it!

Create a string art heart on your spread.
Document 2015 | February, Aly Dosdall
Place your paper on a piercing mat or old mousepad, and center the heart template on your paper. Using a paper piercer, make evenly spaced holes around your shape. Remove your template and you're ready to start sewing. Come in from the back/bottom and start sewing random holes. One thing to watch out for is to stay within the outline of the shape; if you are working with a heart, don't sew across the top where there is supposed to be a "v." Once you've sewn through every hole, go back through again to make it more full. When you're done, tape the tails of the thread to the back with washi.

When it comes to showing a little love, don’t forget to love on your home.
Made with Love | Simple Gifts, Megan Hoeppner
Fill your hoop(s) with fabric, and trim away the excess. Type “Home, where the _____ is” in your word processing program. Try different font combinations until you’ve found one you like. Print the sentiment out in various font sizes so you have options to choose from.(You can download a free template of my text file at the bottom of this lesson.) Once you have the size you want, print it on the Sulky sheet, following the product information. Cut the printed pieces out, and adhere them to your embroidery project. Begin stitching over your printed template using a needle and embroidery floss. Once the stitching is complete, run the entire design under a light stream of water to rinse away the template paper. Just like that, it will wipe clean. Cut a small heart from fabric, and glue it to complete your sentiment: “Home, where the heart is.”

Add texture and interest to your layout by creating your own stitched embellishments.
Old Favorites with a New Twist, Ashley Horton
I like to save my 12” x 12” papers for full backgrounds so that, when I create smaller embellishments, I can grab scrap paper or sheets from my 6” x 6” paper pads. Don’t have a sewing machine? You can still create a stitched look on your embellishments using embroidery floss and a paper piercer to hand-stitch your paper. I used a coordinated set of wood buttons to add to the center of my pie chart embellishments. You could also create a unique look by using flair buttons, enamel dots, or die cuts. I intentionally offset the triangle pieces of paper on my pie chart embellishments to give it that fun, handmade look.
Are you inspired to pick up that sewing needle? Stitching can take your projects to the next level—give it a try and let BPC teachers guide the way! Remember, as a member of Big Picture Classes, you get access to our entire library of classes. Sign up now and start exploring!


Love all of these examples! Thank you for the helpful tips!
Sign in or sign up to comment.